Pengaturan REPMGR Menggunakan WITNESS di PostgreSQL 10

Setting Up REPMGR With WITNESS For PostgreSQL 10 Database

This blog post will go over how to set up and implement repmgr which is the PostgreSQL application to manage replication between primary and replica nodes, allowing for quick and easy failover and rebuilding of replicas. For reference, all commands are run as root. For the commands that need to be run as the Postgres user, I will run them using su. As an example:

su - postgres -c 'COMMAND RUN AS POSTGRES USER'

Outline

  • The Setup
  • SSH
  • REPMGR
  • PostgreSQL Primary Configuration
  • PostgreSQL Replica Configuration
  • PostgreSQL Witness Configuration
  • Summary

The Setup

The environment that I will be working in consists of four CentOS 7 servers with a default install of PostgreSQL 10 installed using yum from the PostgreSQL 10 repo.  With PostgreSQL installed on each server, the Postgres user will already be on each server. I will configure the first server as the primary master. The second and third server will become replicas of the primary master. Then the fourth and final server will become a witness server used for voting in automatic failover scenarios.

base-centos-1 = primary master
base-centos-2 = replica
base-centos-3 = replica
base-centos-4 = witness

SSH

In order for repmgr to work correctly, the Postgres user account will need to be able to SSH to each of the other servers with no prompt.  In order to do this I went to each server and generated an SSH key, and then collected all of the public SSH keys and placed them in an authorzied_keys file on each server.  This allowed me to SSH between the servers with no prompt. I have SELINUX disabled by default. If you are using SELINUX, make sure it is set up correctly for SSH and authorized keys.

On each server, I did the following:

1) [ON ALL SERVERS] Become the Postgres user, create the ssh key, then cat out the public key:

su - postgres -c 'ssh-keygen'
su - postgres -c 'cat ~/.ssh/id_rsa.pub'

2) [ON ALL SERVERS] Create an authorized keys file and set the permissions:

su - postgres -c 'touch ~/.ssh/authorized_keys'
su - postgres -c 'chmod 600 ~/.ssh/authorized_keys'
su - postgres -c 'vi ~/.ssh/authorized_keys'

3) [ON ALL SERVERS] Place all of the public keys from Step 1 into the authorized_keys files created in Step 2.  The authorized_keys file contents looked like the following on all of my servers, with each key as a new line:

ssh-rsa AAAAB3NzaC1yc2EAAAADAQABAAABAQDTXxjFY8dLs2GVRpDY7asAK5SvwITPVSJN9ItnwsVtzCpZgX/Mbnkc/jHgwuIGb0srh/KthByyYJi14QViI+x7xVQm8eyuqMBtORt9rl6rLF73H/gYPO9jONIbD/yihxJMWmJK1Ro6Armhfj5OyTXyW6vjbXqvl7fuSi4n13ubW+G7Pnk8jDK+5rOFYve6Czmde7cQPeueo7sY4oZCbhO+Vr+HwK6qUNUsP3/iRj/bjpbNh8gaqQDl5y5XCNV32y3IhgMgsimO4EkSbb03y0lcWI8dJ6asnXUZumvUwasrFcQ2SFRqb/F3kK4L2Ofy9qYo0yV+FyCuJlsoEur1IRKF postgres@base-centos-1
ssh-rsa AAAAB3NzaC1yc2EAAAADAQABAAABAQDYHmDFOtYc/VDxccNRQEnDYBTE8QDiUTMX46PX1p5tvs6qvP3VPMEccs4um0YVFXZTmbnvyeN3bBPe23NS5Pal6ySfAxIdAAOt5YzKoJ0BJAoHksfTchXsCvSs1zIBLXLSRTYdmjb2s+EWxB9elle4Z2KbZrXbzVkSQuUOdMtbjTPUfIqcVh8kokCznpVjKSEXtHg9Vx1Whg20brw99EzhcBeS5q+jJtQbaSa6VG3VUmsznxtoWiA9EgMZ9C7hcmxTrtKNEJrQvd1LpBObTYbueV7+MVlgShTct88alun12iheT6x6ien445X1lYjLmkjGT8CHNqdos+VQR9sgT5R7 postgres@base-centos-2
ssh-rsa AAAAB3NzaC1yc2EAAAADAQABAAABAQCgQNra4/rDOVWr5uV5nSa49yPLlgAJ6crsYKpvhfRr3L5J/T48QE468Am5t3lA318Nst2FbObq7dduqBNhOQDurPlTiPd9cWQsj0mVySnZ2gD7sc8epyRcNbR5cNBum2JKkez4X8FxArMZwYkvPd28dAPFd30NwLYgIFhQ/jzScweyfX1RYp4s+AOI0XpBAiuQZ6r5Gxz+h61jmsbCwM4ZmT4J8OFIF/x/GFExF126PB2PqEg41OK2AGZ2eneTtaoDxMoVDPuy1vhdUw/aODf1dPZYRTn2rwbdXDW7E6Y8/dxT3Lo1n8v/syboy/MsF50NdYzwOb0/Q4dtYsVPpemV postgres@base-centos-3
ssh-rsa AAAAB3NzaC1yc2EAAAADAQABAAABAQC5UAsmEkw9INHwXL6cpHqOy5O8VIpvLsfklzoHYfmGxBhGqi6nZzV/+TAzpotrmAf7PIUEdzWOm1lTfii1iRU821ks1bSPN2FeBXzK5Mhtl6KHpIXeDOS64WEJRcen2cQIw9f5f6Ji6PBlc3AQBvspxuNtth6Y0vOTq2N+kFTGOM95kuuIzRs7QvU0XrCoMKOn/BBE+e8ad72gwjCP1q9aNheDJBCsB9WhJerN+LOLr2gJiA0Ha6xxSGQ5WoAB17nYSQunsSvvAU079wfVt/e6OMozyNC6X/+I7IRcRg8IHS+aMKvKrasfi5PTawqoideB4QngM6lHmUR9/MFf9Ikt postgres@base-centos-4

4) I am now able to become the Postgres user and SSH to any of the other servers and log in without a password prompt. This is an example on base-centos-1:

[root@base-centos-1 vagrant]# su - postgres
Last login: Mon Jul 22 18:27:34 UTC 2019 on pts/0
-bash-4.2$ ssh base-centos-2
Last login: Mon Jul 22 18:22:31 2019
-bash-4.2$ hostname
base-centos-2

REPMGR

For repmgr, I first installed the repmgr software, and then configured it on each server to make sure all of the configurations are correct. With the installation of PostgreSQL 10 on my servers, I installed the PostgreSQL repository using the following RPM. This repo also includes repmgr, which is where I am installing the software from. You can find the different yum repositories from https://yum.postgresql.org/repopackages.php:

yum install -y https://download.postgresql.org/pub/repos/yum/reporpms/EL-7-x86_64/pgdg-redhat-repo-latest.noarch.rpm

1) [ON ALL SERVERS] I installed repmgr from the PostgreSQL 10 repository. Make sure you install the correct repmgr for the version of PosgreSQL that you are running:

yum install -y repmgr10.x86_64

2) [ON ALL SERVERS] Next, I configured repmgr on each server with the servers specific details. Make sure to update each according to the server and paths. As an example for each server, I updated the node_id, node_name, and conninfo to match the servers I was configuring. If you are using a different version of PostgreSQL you will want to make sure you update the paths for the version you are using. Do NOT assume the paths in my example will be the same on your system. In my setup, the configuration file was located at /etc/repmgr/10/repmgr.conf.

node_id=101
node_name='base-centos-1'
conninfo='host=base-centos-1 dbname=repmgr user=repmgr'
data_directory='/var/lib/pgsql/10/data/'
config_directory='/var/lib/pgsql/10/data'
log_file='/var/log/repmgr.log'
repmgrd_service_start_command = '/usr/pgsql-10/bin/repmgrd -d'
repmgrd_service_stop_command = 'kill `cat $(/usr/pgsql-10/bin/repmgrd --show-pid-file)`'
promote_command='repmgr standby promote -f /etc/repmgr/10/repmgr.conf --siblings-follow --log-to-file'
follow_command='repmgr standby follow -f /etc/repmgr/10/repmgr.conf --log-to-file'
failover=automatic
reconnect_attempts=3
reconnect_interval=5
ssh_options='-q -o StrictHostKeyChecking=no -o ConnectTimeout=10'

3) [ON ALL SERVERS] I created the log file that I configured in Step 2 so I would not get an error when starting the service:

su - postgres -c 'touch /var/log/repmgr.log'


PostgreSQL Primary Configuration

Next, I started working on the primary server to get it set up within repmgr. For the configuration of the pg_bha.conf and postgresql.conf, I am only updating them on the primary master, because when I rebuild the replicas from the master, these changes will get copied over. If your server keeps the configuration files separate from the data directory, you will need to update these configurations on all of the servers, not just on the primary master.

1) Create the repmgr user account and repmgr database that will be used for repmgr to manage the cluster. The repmgr user account will be used for replication to the PostgreSQL replica servers to the primary master.

su - postgres -c 'createuser --replication --createdb --createrole --superuser repmgr'
su - postgres -c "psql -c 'ALTER USER repmgr SET search_path TO repmgr, \"\$user\", public;'"
su - postgres -c 'createdb repmgr --owner=repmgr'

2) Update pg_hba.conf to allow the repmgr account to authenticate. With trust being used, this allows the repmgr user account in the database to authenticate without a password. If you are building a production environment, you will want a more secure method using md5 and passwords. These changes won’t take place until the PostgreSQL service is restarted, which I will do after the next step. In my setup this file is located at /var/lib/pgsql/10/data/pg_hba.conf. I found that I had the best results by specifying the IPs.

host replication repmgr 192.168.56.101/32 trust
host replication repmgr 192.168.56.102/32 trust
host replication repmgr 192.168.56.103/32 trust
host replication repmgr 192.168.56.104/32 trust
host repmgr repmgr 192.168.56.101/32 trust
host repmgr repmgr 192.168.56.102/32 trust
host repmgr repmgr 192.168.56.103/32 trust
host repmgr repmgr 192.168.56.104/32 trust

3) Next, I configured the PostgreSQL configuration file to allow for replication to occur by setting the wal_level and other settings. I also add the repmgr shared libraries into the postgresql.conf file. In my setup, the PostgreSQL configuration file is at /var/lib/pgsql/10/data/postgresql.conf.

listen_addresses = '*'
shared_preload_libraries = 'repmgr'
wal_level = replica
archive_mode = on
max_wal_senders = 10
hot_standby = on
archive_command = 'cp -i %p /var/lib/pgsql/10/data/archive/%f'

4) I then created the archive directory that I specified in the PostgresSQL configuration file using the Postgres user to make sure it had the correct permissions, and then I restarted PostgreSQL server to pick up the new settings.

su - postgres -c 'mkdir /var/lib/pgsql/10/data/archive'
systemctl enable postgresql-10.service
systemctl restart postgresql-10.service
systemctl status postgresql-10.service

5) Now that repmgr and PostgreSQL are both configured, I will register my PostgreSQL server with repmgr and then start the repmgr daemon service so that it monitors the status of the replication cluster.

su - postgres -c 'repmgr primary register'
su - postgres -c 'repmgr daemon start'
su - postgres -c 'repmgr daemon status'
ID | Name | Role | Status | Upstream | repmgrd | PID | Paused? | Upstream last seen
----+---------------+---------+-----------+---------------+---------+------+---------+--------------------
101 | base-centos-1 | primary | * running | | running | 5496 | no | n/a


PostgreSQL Replica Configuration

At this stage I already have SSH and regmgr installed and repmgr configured on all of the servers. Now I will utilize repmgr to backup the databases off of the primary server and restore them onto the two replica servers base-centos-2 and base-centos-3. Because my pg_hba.conf and postgresql.conf files are in the same directory as my data, these files will also get copied over during the backup and restore process. I will be running the following commands on both of the replica servers, but not the final witness server which I will configure later.

1) Stop PostgreSQL and clear the data directory:

systemctl stop postgresql-10.service
rm -rf /var/lib/pgsql/10/data/*

2) Next, I backed up and restored the data from the primary server, and then started the PostgreSQL server and viewed the status to make sure it was running:

su - postgres -c "repmgr -h base-centos-1 -U repmgr -d repmgr standby clone"
systemctl start postgresql-10.service
systemctl status postgresql-10.service

3) Then I register the replica with the repmgr cluster and start the repmgr daemon service to monitor the server in the cluster:

su - postgres -c 'repmgr standby register -h base-centos-1 -U repmgr'
su - postgres -c 'repmgr daemon start'
su - postgres -c 'repmgr daemon status'
ID | Name | Role | Status | Upstream | repmgrd | PID | Paused? | Upstream last seen
----+---------------+---------+-----------+---------------+---------+------+---------+--------------------
101 | base-centos-1 | primary | * running | | running | 5496 | no | n/a
102 | base-centos-2 | standby | running | base-centos-1 | running | 3414 | no | 1 second(s) ago
103 | base-centos-3 | standby | running | base-centos-1 | running | 4549 | no | 1 second(s) ago


4) To verify that the replication is up and running I can run the following commands to validate the replication status:

ON PRIMARY

su - postgres -c 'psql -c "select pid, usename, client_addr, backend_start, state, sync_state from pg_stat_replication;"'
pid | usename | client_addr | backend_start | state | sync_state
-------+---------+----------------+-------------------------------+-----------+------------
15347 | repmgr | 192.168.56.102 | 2019-07-22 18:19:31.232492+00 | streaming | async
15363 | repmgr | 192.168.56.103 | 2019-07-22 18:19:36.566369+00 | streaming | async

ON REPLICAs

su - postgres -c 'psql --pset expanded=auto -c "select * from pg_stat_wal_receiver;"'
-[ RECORD 1 ]---------+------------------------------------------------------------------
pid | 5408
status | streaming
receive_start_lsn | 0/B000000
receive_start_tli | 3
received_lsn | 0/B0025B8
received_tli | 3
last_msg_send_time | 2019-07-22 18:22:17.942712+00
last_msg_receipt_time | 2019-07-22 18:22:17.943306+00
latest_end_lsn | 0/B0025B8
latest_end_time | 2019-07-22 18:19:47.617303+00
slot_name |
conninfo | user=repmgr host='base-centos-1' application_name='base-centos-3'

PostgreSQL Witness Configuration

Having a separate witness is good in the event that there is a network outage and you want a server to vote on who should become the new master. This will help prevent split-brain scenarios, with the understanding that you cannot truly prevent split brains unless you implement a configuration management solution like consul or zookeeper. The important thing to note when setting up a witness is that the witness has to use its own repmgr database. You CANNOT make a standby replica server a witness. I will NOT be restoring the database from the primary onto the witness server, so I will have to repeat a couple of the steps to create the repmgr user and database which will be separate. I then have to configure the pg_hba settings to allow for the repmgr user from the other servers to talk to the witness.

1) Create the repmgr user account and repmgr database that will be used for repmgr to manage the cluster. The repmgr user account will be used for replication to the PostgreSQL replica servers to the primary master.

su - postgres -c 'createuser --replication --createdb --createrole --superuser repmgr'
su - postgres -c "psql -c 'ALTER USER repmgr SET search_path TO repmgr, \"\$user\", public;'"
su - postgres -c 'createdb repmgr --owner=repmgr'

2) Update pg_hba.conf to allow the repmgr account to authenticate. With trust being used, the PosgreSQL user can authenticate without a password. If you are building a production environment, you will want a more secure method using md5 and passwords. These changes won’t take place until PostgreSQL service has been restarted, which I will do after the next step. In my setup, this file is located at /var/lib/pgsql/10/data/pg_hba.conf.

host replication repmgr 192.168.56.101/32 trust
host replication repmgr 192.168.56.102/32 trust
host replication repmgr 192.168.56.103/32 trust
host replication repmgr 192.168.56.104/32 trust
host repmgr repmgr 192.168.56.101/32 trust
host repmgr repmgr 192.168.56.102/32 trust
host repmgr repmgr 192.168.56.103/32 trust
host repmgr repmgr 192.168.56.104/32 trust

3) Register the witness with the primary server in the cluster:

su - postgres -c 'repmgr witness register -h base-centos-1 -U repmgr'
su - postgres -c 'repmgr daemon start'
su - postgres -c 'repmgr daemon status'
ID | Name | Role | Status | Upstream | repmgrd | PID | Paused? | Upstream last seen
----+---------------+---------+-----------+---------------+---------+------+---------+--------------------
101 | base-centos-1 | primary | * running | | running | 5496 | no | n/a
102 | base-centos-2 | standby | running | base-centos-1 | running | 3414 | no | 1 second(s) ago
103 | base-centos-3 | standby | running | base-centos-1 | running | 4549 | no | 1 second(s) ago
104 | base-centos-4 | witness | * running | base-centos-1 | running | 3226 | no | 0 second(s) ago

Summary

Now I have a fully configured repmgr cluster that allows for me to failover from the primary to one of the replicas. As an example, I can run the following to migrate the primary role to one of the standbys. In order to run this, the failover command has to be run on the standby that is becoming the new primary:

su - postgres -c 'repmgr --dry-run -h base-centos-2 standby switchover --siblings-follow'
su - postgres -c 'repmgr -h base-centos-2 standby switchover --siblings-follow'
su - postgres -c 'repmgr cluster show'
su - postgres -c 'repmgr cluster event'

FAILOVER TO base-centos-2

su - postgres -c 'repmgr -h base-centos-2 standby switchover --siblings-follow'
WARNING: following problems with command line parameters detected:
database connection parameters not required when executing UNKNOWN ACTION
NOTICE: executing switchover on node "base-centos-2" (ID: 102)
NOTICE: local node "base-centos-2" (ID: 102) will be promoted to primary; current primary "base-centos-1" (ID: 101) will be demoted to standby
NOTICE: stopping current primary node "base-centos-1" (ID: 101)
NOTICE: issuing CHECKPOINT
DETAIL: executing server command "/usr/pgsql-10/bin/pg_ctl -D '/var/lib/pgsql/10/data' -W -m fast stop"
INFO: checking for primary shutdown; 1 of 60 attempts ("shutdown_check_timeout")
INFO: checking for primary shutdown; 2 of 60 attempts ("shutdown_check_timeout")
NOTICE: current primary has been cleanly shut down at location 0/C000028
NOTICE: promoting standby to primary
DETAIL: promoting server "base-centos-2" (ID: 102) using "/usr/pgsql-10/bin/pg_ctl -w -D '/var/lib/pgsql/10/data' promote"
waiting for server to promote.... done
server promoted
NOTICE: waiting up to 60 seconds (parameter "promote_check_timeout") for promotion to complete
NOTICE: STANDBY PROMOTE successful
DETAIL: server "base-centos-2" (ID: 102) was successfully promoted to primary
INFO: local node 101 can attach to rejoin target node 102
DETAIL: local node's recovery point: 0/C000028; rejoin target node's fork point: 0/C000098
NOTICE: setting node 101's upstream to node 102
WARNING: unable to ping "host=base-centos-1 dbname=repmgr user=repmgr"
DETAIL: PQping() returned "PQPING_NO_RESPONSE"
NOTICE: starting server using "/usr/pgsql-10/bin/pg_ctl -w -D '/var/lib/pgsql/10/data' start"
NOTICE: NODE REJOIN successful
DETAIL: node 101 is now attached to node 102
NOTICE: executing STANDBY FOLLOW on 2 of 2 siblings
INFO: node 104 received notification to follow node 102
INFO: STANDBY FOLLOW successfully executed on all reachable sibling nodes
NOTICE: switchover was successful
DETAIL: node "base-centos-2" is now primary and node "base-centos-1" is attached as standby
NOTICE: STANDBY SWITCHOVER has completed successfully

CLUSTER STATUS

su - postgres -c 'repmgr cluster show'
ID | Name | Role | Status | Upstream | Location | Priority | Timeline | Connection string
-----+---------------+---------+-----------+---------------+----------+----------+----------+----------------------------------------------
101 | base-centos-1 | standby | running | base-centos-2 | default | 100 | 3 | host=base-centos-1 dbname=repmgr user=repmgr
102 | base-centos-2 | primary | * running | | default | 100 | 4 | host=base-centos-2 dbname=repmgr user=repmgr
103 | base-centos-3 | standby | running | base-centos-2 | default | 100 | 3 | host=base-centos-3 dbname=repmgr user=repmgr
104 | base-centos-4 | witness | * running | base-centos-2 | default | 0 | 1 | host=base-centos-4 dbname=repmgr user=repmgr

CLUSTER EVENTS FOR FAILOVER

su - postgres -c 'repmgr cluster event'
Node ID | Name | Event | OK | Timestamp | Details
---------+---------------+----------------------------+----+---------------------+-------------------------------------------------------------------------
102 | base-centos-2 | child_node_new_connect | t | 2019-07-22 20:00:04 | new witness "base-centos-4" (ID: 104) has connected
102 | base-centos-2 | child_node_new_connect | t | 2019-07-22 20:00:04 | new standby "base-centos-3" (ID: 103) has connected
104 | base-centos-4 | witness_register | t | 2019-07-22 19:59:59 | witness registration succeeded; upstream node ID is 102
103 | base-centos-3 | standby_follow | t | 2019-07-22 19:59:59 | standby attached to upstream node "base-centos-2" (ID: 102)
104 | base-centos-4 | repmgrd_upstream_reconnect | t | 2019-07-22 19:59:59 | witness monitoring connection to primary node "base-centos-2" (ID: 102)
102 | base-centos-2 | repmgrd_reload | t | 2019-07-22 19:59:58 | monitoring cluster primary "base-centos-2" (ID: 102)
101 | base-centos-1 | repmgrd_standby_reconnect | t | 2019-07-22 19:59:58 | node has become a standby, monitoring connection to upstream node 102
102 | base-centos-2 | standby_switchover | t | 2019-07-22 19:59:54 | node 102 promoted to primary, node 101 demoted to standby
101 | base-centos-1 | node_rejoin | t | 2019-07-22 19:59:54 | node 101 is now attached to node 102
102 | base-centos-2 | standby_promote | t | 2019-07-22 19:59:54 | server "base-centos-2" (ID: 102) was successfully promoted to primary

Mengelola Data Hirarki di PostgreSQL

Pojok Programmer Mengelola Data Hirarki di PostgreSQL

[**Database**](http://pojokprogrammer.net/tags/database) [**Tips**](http://pojokprogrammer.net/tags/tips-dan-trik) | Semua programmer yang berkonsentrasi di pengembangan aplikasi perkantoran (*office application*) pasti pernah berhadapan dengan data hirarki (***hierarchical data***) ke dalam database relasional (*relational database*). Jika sebelumnya kita mempelajari cara mengelola data [**hirarki di MySQL**](http://pojokprogrammer.net/content/mengelola-data-hirarki-di-mysql), maka pada artikel inimkita akan mempelajarinya di [PostgreSQL](http://pojokprogrammer.net/tags/postgresql). RDBMS sendiri tidak diperuntukkan untuk menyimpan data hirarki karena relasi antar table bukanlah relasi hirarki. Namun di PostgreSQL kita bisa memanfaatkan fitur ***Common Table Expression (CTE)*** untuk melakukan reksi di SQL Query. Data hirarki yang umumnya terdapat dalam aplikasi perkantoran, seperti data departemen, cabang, kategori barang, chart of accounts, dan sebagainya. Dalam artikel ini kita akan mencoba menggunakan data ***Chart of Accounts*** atau ***Perkiraan*** yang sangat diperlukan dalam sebuah aplikasi akuntansi (*Accounting System*)

(more…)

Mengelola Data Hirarki di MySQL

Pojok Programmer Mengelola Data Hirarki di MySQL

[**Database**](http://pojokprogrammer.net/tags/database) [**Tips**](http://pojokprogrammer.net/tags/tips-dan-trik) | Semua programmer yang berkonsentrasi di pengembangan aplikasi perkantoran (*office application*) pasti pernah berhadapan dengan data hirarki (***hierarchical data***) ke dalam database relasional (*relational database*) seperti MySQL. RDBMS sendiri tidak diperuntukkan untuk menyimpan data hirarki karena relasi antar table bukanlah relasi hirarki. Namun kita bisa merepresentasikan data hirarki menggunakan relasi ***self-reference***, atau relasi *foreign key* ke table yang sama.

**Data Hirarki** adalah sekumpulan data yang masing-masingnya memiliki satu ***parent*** dengan pengecualian untuk data ***root***. Masing-saing data dalam hirarki juga bisa memilik satu atau beberapa ***child***, atau tidak memiliki child untuk data pada level terendah, yang biasa disebut ***leaf***. Data hirarki yang umumnya terdapat dalam aplikasi perkantoran, seperti data departemen, cabang, kategori barang, chart of accounts, dan sebagainya. Dalam artikel ini kita akan mencoba menggunakan data ***Chart of Accounts*** atau ***Perkiraan*** yang sangat diperlukan dalam sebuah aplikasi akuntansi (*Accounting System*), seperti tampak pada gambar di bawah ini,

![Hirarki Perkiraan (Chart of Account COA Hierarchy](http://pojokprogrammer.net/sites/default/files/pictures/database/hirarki-01.png)
![Hirarki Perkiraan (Chart of Account COA Hierarchy](http://pojokprogrammer.net/sites/default/files/pictures/database/hirarki-02.png)

### Adjacency List Model

**Cara termudah** merepresentasikan data hirarki di dalam database relasional adalah dengan menggunakan model ***Senarai Ketetanggaan*** (***Adjacency List***). dalam model senarai ketetanggaan ini, setiap record memiliki pointer ke *parent* dari record tersebut. Khusus untuk *root* atau data paling atas tidak memiliki parent maka kita set NULL untuk *parent* dari *root*. Untuk contoh kasus kita, maka yang menjadi ***root*** adalah record ***Assets***, ***Liabilities***, dan ***Equities***.

**Keuntungan** penggunaan senarai ketetanggaan adalah kesederhanaannya, karena kita bisa dengan mudah melihat *parent* dari *Petty Cash* adalah *Current Assets*, yang sekaligus merupakan *child* dari *Assets*. Berikut ini adalah DDL dan DML yang kita gunakan sebagai contoh kasus.

CREATE TABLE accounts
(
  id integer  auto_increment,
  code varchar(255) NOT NULL,
  name varchar(255) NOT NULL,
  parent_id integer,
  PRIMARY KEY (id),
  FOREIGN KEY (parent_id)
      REFERENCES accounts (id) 
      ON UPDATE CASCADE ON DELETE RESTRICT
);

INSERT INTO accounts (id, code, name, parent_id) VALUES(1000, '1000', 'Assets', NULL);
INSERT INTO accounts (id, code, name, parent_id) VALUES(1100, '1100', 'Current Assets', 1000);
INSERT INTO accounts (id, code, name, parent_id) VALUES(1110, '1110', 'Petty Cash', 1100);
INSERT INTO accounts (id, code, name, parent_id) VALUES(1120, '1120', 'Savings Account', 1100);
INSERT INTO accounts (id, code, name, parent_id) VALUES(1130, '1130', 'Deposits Account', 1100);
INSERT INTO accounts (id, code, name, parent_id) VALUES(1150, '1150', 'Accounts Receivables', 1100);
INSERT INTO accounts (id, code, name, parent_id) VALUES(1200, '1200', 'Fixed Assets', 1000);
INSERT INTO accounts (id, code, name, parent_id) VALUES(1210, '1210', 'Furnitures', 1200);
INSERT INTO accounts (id, code, name, parent_id) VALUES(1220, '1220', 'Equipments', 1200);
INSERT INTO accounts (id, code, name, parent_id) VALUES(1230, '1230', 'Vehicles', 1200);
INSERT INTO accounts (id, code, name, parent_id) VALUES(1250, '1250', 'Buildings', 1200);
INSERT INTO accounts (id, code, name, parent_id) VALUES(1900, '1900', 'Other Assets', 1000);
INSERT INTO accounts (id, code, name, parent_id) VALUES(1910, '1910', 'Patents', 1900);
INSERT INTO accounts (id, code, name, parent_id) VALUES(1990, '1990', 'Other Assets', 1900);
INSERT INTO accounts (id, code, name, parent_id) VALUES(2000, '2000', 'Liabilities', NULL);
INSERT INTO accounts (id, code, name, parent_id) VALUES(2100, '2100', 'Current Liabilities', 2000);
INSERT INTO accounts (id, code, name, parent_id) VALUES(2110, '2110', 'Accrued Expenses', 2100);
INSERT INTO accounts (id, code, name, parent_id) VALUES(2120, '2120', 'Accounts Payable', 2100);
INSERT INTO accounts (id, code, name, parent_id) VALUES(2130, '2130', 'Tax Payable', 2100);
INSERT INTO accounts (id, code, name, parent_id) VALUES(2200, '2200', 'Long-Term Liabilities', 2000);
INSERT INTO accounts (id, code, name, parent_id) VALUES(2210, '2210', 'Equipments Payable', 2200);
INSERT INTO accounts (id, code, name, parent_id) VALUES(2220, '2220', 'Vehicles Payable', 2200);
INSERT INTO accounts (id, code, name, parent_id) VALUES(2240, '2240', 'Buildings Payable', 2200);
INSERT INTO accounts (id, code, name, parent_id) VALUES(2250, '2250', 'Loans Payable', 2200);
INSERT INTO accounts (id, code, name, parent_id) VALUES(3000, '3000', 'Equity', NULL);
INSERT INTO accounts (id, code, name, parent_id) VALUES(3100, '3100', 'Capital', 3000);
INSERT INTO accounts (id, code, name, parent_id) VALUES(3110, '3110', 'Founders Capital', 3100);
INSERT INTO accounts (id, code, name, parent_id) VALUES(3120, '3120', 'Invenstors Capital', 3100);
INSERT INTO accounts (id, code, name, parent_id) VALUES(3190, '3190', 'Others Capital', 3100);
INSERT INTO accounts (id, code, name, parent_id) VALUES(3200, '3200', 'Earnings', 3000);
INSERT INTO accounts (id, code, name, parent_id) VALUES(3210, '3210', 'Retained Earnings', 3200);
INSERT INTO accounts (id, code, name, parent_id) VALUES(3220, '3220', 'Current Earnings', 3200);

### Membaca Keseluruhan Hirarki

Hal **yang pasti kita hadapi** saat mengelola data hirarki adalah menampilkan keseluruhan data, biasanya berbentuk ***tree*** dengan tambahan indentasi untuk level yang lebih rendah. Cara paling mudah untuk mencapai hal ini di MySQL adalah dengan menggunakan ***self-join***. Berikut ini **query hirarki** (***hierarchical query***) untuk mendapatkan *tree* ***Assets***

SELECT t1.id, t1.code
, t1.name AS name_level1, t2.name as name_level2
, t3.name AS name_level3, t4.name as name_level4
FROM accounts AS t1
LEFT JOIN accounts AS t2 ON t2.parent_id = t1.id
LEFT JOIN accounts AS t3 ON t3.parent_id = t2.id
LEFT JOIN accounts AS t4 ON t4.parent_id = t3.id
WHERE t1.name = 'Assets'
ORDER BY t1.code, t2.code, t3.code, t4.code

Hasilnya akan tampak seperti ini

+------+------+-------------+----------------+----------------------+-------------+
| id   | code | name_level1 | name_level2    | name_level3          | name_level4 |
+------+------+-------------+----------------+----------------------+-------------+
| 1000 | 1000 | Assets      | Current Assets | Petty Cash           | NULL        |
| 1000 | 1000 | Assets      | Current Assets | Savings Account      | NULL        |
| 1000 | 1000 | Assets      | Current Assets | Deposits Account     | NULL        |
| 1000 | 1000 | Assets      | Current Assets | Accounts Receivables | NULL        |
| 1000 | 1000 | Assets      | Fixed Assets   | Furnitures           | NULL        |
| 1000 | 1000 | Assets      | Fixed Assets   | Equipments           | NULL        |
| 1000 | 1000 | Assets      | Fixed Assets   | Vehicles             | NULL        |
| 1000 | 1000 | Assets      | Fixed Assets   | Buildings            | NULL        |
| 1000 | 1000 | Assets      | Other Assets   | Patents              | NULL        |
| 1000 | 1000 | Assets      | Other Assets   | Other Assets         | NULL        |
+------+------+-------------+----------------+----------------------+-------------+
10 rows in set (0.00 sec)

### Menambahkan *Level* dan *Path*

Jika kita ingin menambahkan kolom yang berisikan level dari masing-masing record, maka kita harus lebih kreatif dalam membangun ***Hierarchical Query*** ini. Karena MySQL belum mendukung ***Common Table Expression*** untuk melakukan ***Recursive Query***, maka yang perlu kita lakukan adalah melakukan query untuk masing-masing level dan kemudian menggabungkannya menggunakan **UNION**. Perhatikan dalam query kali ini kita menggunakan **INNER JOIN**

-- Level 1
SELECT t1.id, t1.code, t1.name, 1 AS level
, t1.name AS name_level1, null as name_level2
, null as name_level3, null as name_level4
, t1.code AS path
FROM accounts AS t1
WHERE t1.parent_id is null
-- Level 2
UNION ALL
SELECT t2.id, t2.code, t2.name, 2 AS level
, t1.name AS name_level1, t2.name as name_level2
, null as name_level3, null as name_level4
, concat(t1.code,'/',t2.code) AS path
FROM accounts AS t1
JOIN accounts AS t2 ON t2.parent_id = t1.id
WHERE t1.parent_id is null
-- Level 3
UNION ALL
SELECT t3.id, t3.code, t3.name, 3 AS level
, t1.name AS name_level1, t2.name as name_level2
, t3.name AS name_level3, null as name_level4
, concat(t1.code,'/',t2.code,'/',t3.code) AS path
FROM accounts AS t1
JOIN accounts AS t2 ON t2.parent_id = t1.id
JOIN accounts AS t3 ON t3.parent_id = t2.id
WHERE t1.parent_id is null
-- Level 3
UNION ALL
SELECT t4.id, t4.code, t4.name, 4 AS level
, t1.name AS name_level1, t2.name as name_level2
, t3.name AS name_level3, t4.name as name_level4
, concat(t1.code,'/',t2.code,'/',t3.code,'/',t4.code) AS path
FROM accounts AS t1
JOIN accounts AS t2 ON t2.parent_id = t1.id
JOIN accounts AS t3 ON t3.parent_id = t2.id
JOIN accounts AS t4 ON t4.parent_id = t3.id
WHERE t1.parent_id is null
-- Ordering Result
ORDER BY path

Hasilnya akan tampak seperti ini

+------+------+-----------------------+-------+-------------+-----------------------+----------------------+-------------+----------------+
| id   | code | name                  | level | name_level1 | name_level2           | name_level3          | name_level4 | path           |
+------+------+-----------------------+-------+-------------+-----------------------+----------------------+-------------+----------------+
| 1000 | 1000 | Assets                |     1 | Assets      | NULL                  | NULL                 | NULL        | 1000           |
| 1100 | 1100 | Current Assets        |     2 | Assets      | Current Assets        | NULL                 | NULL        | 1000/1100      |
| 1110 | 1110 | Petty Cash            |     3 | Assets      | Current Assets        | Petty Cash           | NULL        | 1000/1100/1110 |
| 1120 | 1120 | Savings Account       |     3 | Assets      | Current Assets        | Savings Account      | NULL        | 1000/1100/1120 |
| 1130 | 1130 | Deposits Account      |     3 | Assets      | Current Assets        | Deposits Account     | NULL        | 1000/1100/1130 |
| 1150 | 1150 | Accounts Receivables  |     3 | Assets      | Current Assets        | Accounts Receivables | NULL        | 1000/1100/1150 |
| 1200 | 1200 | Fixed Assets          |     2 | Assets      | Fixed Assets          | NULL                 | NULL        | 1000/1200      |
| 1210 | 1210 | Furnitures            |     3 | Assets      | Fixed Assets          | Furnitures           | NULL        | 1000/1200/1210 |
| 1220 | 1220 | Equipments            |     3 | Assets      | Fixed Assets          | Equipments           | NULL        | 1000/1200/1220 |
| 1230 | 1230 | Vehicles              |     3 | Assets      | Fixed Assets          | Vehicles             | NULL        | 1000/1200/1230 |
| 1250 | 1250 | Buildings             |     3 | Assets      | Fixed Assets          | Buildings            | NULL        | 1000/1200/1250 |
| 1900 | 1900 | Other Assets          |     2 | Assets      | Other Assets          | NULL                 | NULL        | 1000/1900      |
| 1910 | 1910 | Patents               |     3 | Assets      | Other Assets          | Patents              | NULL        | 1000/1900/1910 |
| 1990 | 1990 | Other Assets          |     3 | Assets      | Other Assets          | Other Assets         | NULL        | 1000/1900/1990 |
| 2000 | 2000 | Liabilities           |     1 | Liabilities | NULL                  | NULL                 | NULL        | 2000           |
| 2100 | 2100 | Current Liabilities   |     2 | Liabilities | Current Liabilities   | NULL                 | NULL        | 2000/2100      |
| 2110 | 2110 | Accrued Expenses      |     3 | Liabilities | Current Liabilities   | Accrued Expenses     | NULL        | 2000/2100/2110 |
| 2120 | 2120 | Accounts Payable      |     3 | Liabilities | Current Liabilities   | Accounts Payable     | NULL        | 2000/2100/2120 |
| 2130 | 2130 | Tax Payable           |     3 | Liabilities | Current Liabilities   | Tax Payable          | NULL        | 2000/2100/2130 |
| 2200 | 2200 | Long-Term Liabilities |     2 | Liabilities | Long-Term Liabilities | NULL                 | NULL        | 2000/2200      |
| 2210 | 2210 | Equipments Payable    |     3 | Liabilities | Long-Term Liabilities | Equipments Payable   | NULL        | 2000/2200/2210 |
| 2220 | 2220 | Vehicles Payable      |     3 | Liabilities | Long-Term Liabilities | Vehicles Payable     | NULL        | 2000/2200/2220 |
| 2240 | 2240 | Buildings Payable     |     3 | Liabilities | Long-Term Liabilities | Buildings Payable    | NULL        | 2000/2200/2240 |
| 2250 | 2250 | Loans Payable         |     3 | Liabilities | Long-Term Liabilities | Loans Payable        | NULL        | 2000/2200/2250 |
| 3000 | 3000 | Equity                |     1 | Equity      | NULL                  | NULL                 | NULL        | 3000           |
| 3100 | 3100 | Capital               |     2 | Equity      | Capital               | NULL                 | NULL        | 3000/3100      |
| 3110 | 3110 | Founders Capital      |     3 | Equity      | Capital               | Founders Capital     | NULL        | 3000/3100/3110 |
| 3120 | 3120 | Invenstors Capital    |     3 | Equity      | Capital               | Invenstors Capital   | NULL        | 3000/3100/3120 |
| 3190 | 3190 | Others Capital        |     3 | Equity      | Capital               | Others Capital       | NULL        | 3000/3100/3190 |
| 3200 | 3200 | Earnings              |     2 | Equity      | Earnings              | NULL                 | NULL        | 3000/3200      |
| 3210 | 3210 | Retained Earnings     |     3 | Equity      | Earnings              | Retained Earnings    | NULL        | 3000/3200/3210 |
| 3220 | 3220 | Current Earnings      |     3 | Equity      | Earnings              | Current Earnings     | NULL        | 3000/3200/3220 |
+------+------+-----------------------+-------+-------------+-----------------------+----------------------+-------------+----------------+
32 rows in set (0.01 sec)

### Mencari Semua *Leaf Node*

Kita juga bisa mendapatkan semua ***leaf node***, yaitu node pada level terbawah dan tidak memiliki **child**, dengan menggunakan **LEFT JOIN**

-- Level 1
SELECT t1.id, t1.code
, t1.name AS name_level1, t2.name as name_level2
, t3.name AS name_level3, t4.name as name_level4
FROM accounts AS t1
LEFT JOIN accounts AS t2 ON t2.parent_id = t1.id
LEFT JOIN accounts AS t3 ON t3.parent_id = t2.id
LEFT JOIN accounts AS t4 ON t4.parent_id = t3.id
WHERE t1.parent_id is null
ORDER BY t1.code, t2.code, t3.code, t4.code

Hasilnya adaah seperti ini.

+------+------+-------------+-----------------------+----------------------+-------------+
| id   | code | name_level1 | name_level2           | name_level3          | name_level4 |
+------+------+-------------+-----------------------+----------------------+-------------+
| 1000 | 1000 | Assets      | Current Assets        | Petty Cash           | NULL        |
| 1000 | 1000 | Assets      | Current Assets        | Savings Account      | NULL        |
| 1000 | 1000 | Assets      | Current Assets        | Deposits Account     | NULL        |
| 1000 | 1000 | Assets      | Current Assets        | Accounts Receivables | NULL        |
| 1000 | 1000 | Assets      | Fixed Assets          | Furnitures           | NULL        |
| 1000 | 1000 | Assets      | Fixed Assets          | Equipments           | NULL        |
| 1000 | 1000 | Assets      | Fixed Assets          | Vehicles             | NULL        |
| 1000 | 1000 | Assets      | Fixed Assets          | Buildings            | NULL        |
| 1000 | 1000 | Assets      | Other Assets          | Patents              | NULL        |
| 1000 | 1000 | Assets      | Other Assets          | Other Assets         | NULL        |
| 2000 | 2000 | Liabilities | Current Liabilities   | Accrued Expenses     | NULL        |
| 2000 | 2000 | Liabilities | Current Liabilities   | Accounts Payable     | NULL        |
| 2000 | 2000 | Liabilities | Current Liabilities   | Tax Payable          | NULL        |
| 2000 | 2000 | Liabilities | Long-Term Liabilities | Equipments Payable   | NULL        |
| 2000 | 2000 | Liabilities | Long-Term Liabilities | Vehicles Payable     | NULL        |
| 2000 | 2000 | Liabilities | Long-Term Liabilities | Buildings Payable    | NULL        |
| 2000 | 2000 | Liabilities | Long-Term Liabilities | Loans Payable        | NULL        |
| 3000 | 3000 | Equity      | Capital               | Founders Capital     | NULL        |
| 3000 | 3000 | Equity      | Capital               | Invenstors Capital   | NULL        |
| 3000 | 3000 | Equity      | Capital               | Others Capital       | NULL        |
| 3000 | 3000 | Equity      | Earnings              | Retained Earnings    | NULL        |
| 3000 | 3000 | Equity      | Earnings              | Current Earnings     | NULL        |
+------+------+-------------+-----------------------+----------------------+-------------+
22 rows in set (0.00 sec)

### Kesimpulan

Meskipun **terlihat mudah**, ada beberapa hal yang perlu kita perhatikan dalam mengelola data hirarki di MySQL ini,

– Kita harus mengetahui jumlah level sejak awal
– Setiap ada penambahan level, maka kita juga harus menambahkan ***left join*** lagi ke dalam query. Perlu diketahui bahwa semakin banyak *left join* maka kinerja (*performance*) mysql akan menurun.
– Penghapusan record (*node*) tidak boleh dilakukan secara sembarangan karena ada resiko tree akan berantakan jika ada child yang mengacu ke node yang dihapus. Namun hal ini bisa diatasi dengan ***Foreign Key Constraint***.

Cara lain untuk mengembangkan query hirarki ini adalah dengan menggunakan ***stored procedure*** untuk membangun query secara dinamis sehingga bisa mengantisipasi jumlah level yang lebeih banyak dan bahkan tidak terbatas.

Semoga berguna!

.

Filter Data Menggunakan Tanggal dan Karakter di VB.net

Filter Pengambilan Data Menggunakan Tanggal dan Karakter di VB.net

Tips dan Trik | Saat membangun sebuah aplikasi database, pasti kita akan bertemu dengan kasus pengolahan data yang besar atau proses pengambilan (retrieval) data yang luar biasa banyak. Untuk memudahkan proses pengambilan data, dan pengolahannya, maka kita harus tahu bagaimana cara mengambil data dengan kriteria tertentu dari database. Proses Filter data ini menjadi penting karena sesungguhnya pengguna tidak memerlukan seluruh data yang ada di database, namun hanya sebagian kecil saja. Misalkan data transaksi keuangan yang tersimpan bisa jutaan row berisikan data beberapa tahun terakhir, biasanya pengguna hanya memerlukan data transaksi di bulan tertentu saja. Artikel ini akan mencoba menjelaskan cara melakukan filter data dari database berdasarkan beberapa kriteria sekaligus, yaitu berdasarkan string, angka, dan tanggal.

Misalkan kita memiliki 2 (dua buah table) yaitu Orders dan OrderTypes. Table Orders menyimpan data-data transaksi berikut dengan tanggal dan jenis transaksi. Table OrderTypes menyimpan definisi jenis-jenis transaksi yang ada, misalkan transaksi Purchase Order, Deliveri Order dan sebagainya. Penampakan isi table Orders adalah seperti pada gambar di bawah ini,

Filter Pengambilan Data Menggunakan Tanggal dan Karakter di VB.net

Sedangkan isi table OrderTypes seperti tampak pada gambar di bawah ini.

Filter Pengambilan Data Menggunakan Tanggal dan Karakter di VB.net

Kemudian kita coba buat sebuah desain form seperti tampak pada gambar di bawah ini. Kita akan menggunakan control TextBox untuk filter berdasarkan Nomor Transaksi, kemudian menggunakan DateTimePicker untuk filter berdasarkan tanggal transaksi, dan ComboBox untuk filter berdasarkan Jenis Transaksi. Dengan cara ini kita mendapatkan beberapa model filter sekaligus (y).

Filter Pengambilan Data Menggunakan Tanggal dan Karakter di VB.net

Berikutnya yang kita perlukan adalah code untuk proses-proses berikut ini

  • Inisialisasi kriteria filter tanggal transaksi
  • Inisialisasi kriteria filter jenis transaksi
  • proses pengambilan data dari database

Untuk proses pengambilan data dari database, aplikasi contoh kita menggunakan SQL Server 2012 LocalDB dengan connection string seperti di bawah ini

Private Const _cnString As String = "Data Source=(LocalDB)\v11.0;AttachDbFilename=|DataDirectory|\dbSample.mdf;Integrated Security=True"

Untuk inisialisasi kriteria filter tanggal, maka kita cukup memberikan nilai tanggal ke control DateTimePicker berupa tanggal awal dan tanggal akhir tahun saja, dengan asumsi pengguna ingin melihat data pada tahun ini secara default. Maka code-nya akan tampak seperti ini.

    Private Sub InitializeDatePicker()
        ' set value date time picker ke awal dan akhir tahun
        DateTimePicker1.Value = "2014-01-01"
        DateTimePicker2.Value = "2014-12-31"
    End Sub

Untuk jenis transaksi, kita mengambil jenis-jenis transaksi yang tersedia di dalam tabel OrderTypes kemudian memuatnya ke ComboBox, sehingga code-nya akan tampak seperti ini

    Private Sub InitializeComboBox()
        ' siapkan koneksi database
        Dim cn As New SqlConnection(_cnString)
        ' siapkan data adapter untuk data retrieval
        Dim da As New SqlDataAdapter("select * from OrderTypes", cn)
        ' siapkan datatable untuk menampung data dari database
        Dim dt As New DataTable
        ' enclose di dalam try-catch block
        ' untuk menghindari crash jika terjadi kesalahan database
        Try
            ' ambil data dari database
            da.Fill(dt)
            ' bind data ke combobox
            ComboBox1.DataSource = dt
            ComboBox1.ValueMember = "ID"
            ComboBox1.DisplayMember = "Description"
            ' DONE!!!
        Catch ex As Exception
            ' tampilkan pesan error
            MessageBox.Show(ex.Message)
        End Try
    End Sub

Untuk proses penampilan data ke grid, maka yang kita lakukan adalah membuat perintah SQL berdasarkan kriteria yang diberikan pengguna kemudian mengambilnya dari database dan memuat data yang didapat ke dalam GridView. Maka code-nya akan tampak seperti di bawah ini.

    Private Sub RefreshGrid()
        ' siapkan koneksi database
        Dim cn As New SqlConnection(_cnString)
        ' siapkan data adapter untuk data retrieval
        Dim da As New SqlDataAdapter("SELECT A.*, B.Description AS TypeName " & _
                                     "FROM Orders A JOIN OrderTypes B ON A.TypeID=B.ID " & _
                                     "WHERE OrderNum LIKE @p1 AND TypeID = @t1 " & _
                                     "AND OrderDate BETWEEN @d1 AND @d2 ", cn)
        da.SelectCommand.Parameters.AddWithValue("@p1", "%" & TextBox1.Text & "%")
        da.SelectCommand.Parameters.AddWithValue("@t1", ComboBox1.SelectedValue)
        da.SelectCommand.Parameters.AddWithValue("@d1", DateTimePicker1.Value.ToString("yyyy-MM-dd"))
        da.SelectCommand.Parameters.AddWithValue("@d2", DateTimePicker2.Value.ToString("yyyy-MM-dd"))
        ' siapkan datatable untuk menampung data dari database
        Dim dt As New DataTable
        ' enclose di dalam try-catch block
        ' untuk menghindari crash jika terjadi kesalahan database
        Try
            ' ambil data dari database
            da.Fill(dt)
            ' bind data ke combobox
            DataGridView1.DataSource = dt
            ' DONE!!!
        Catch ex As Exception
            ' tampilkan pesan error
            MessageBox.Show(ex.Message)
        End Try
    End Sub

Secara keseluruhan, Code dalam Form kita menjadi seperti ini, termasuk di dalamnya procedure New dan Event Handler untuk menangani event click di tombol Filter.

Imports System.Data.SqlClient

Public Class Form1
    Private Const _cnString As String = "Data Source=(LocalDB)\v11.0;AttachDbFilename=|DataDirectory|\dbSample.mdf;Integrated Security=True"

    Public Sub New()
        ' required by form designer
        InitializeComponent()
        ' inisialisasi datetimepicker
        InitializeDatePicker()
        ' inisialisasi combobox jenis transaksi
        InitializeComboBox()
        ' refresh grid data
        RefreshGrid()
    End Sub

    Private Sub InitializeDatePicker()
        ' set value date time picker ke awal dan akhir tahun
        DateTimePicker1.Value = "2014-01-01"
        DateTimePicker2.Value = "2014-12-31"
    End Sub

    Private Sub InitializeComboBox()
        ' siapkan koneksi database
        Dim cn As New SqlConnection(_cnString)
        ' siapkan data adapter untuk data retrieval
        Dim da As New SqlDataAdapter("select * from OrderTypes", cn)
        ' siapkan datatable untuk menampung data dari database
        Dim dt As New DataTable
        ' enclose di dalam try-catch block
        ' untuk menghindari crash jika terjadi kesalahan database
        Try
            ' ambil data dari database
            da.Fill(dt)
            ' bind data ke combobox
            ComboBox1.DataSource = dt
            ComboBox1.ValueMember = "ID"
            ComboBox1.DisplayMember = "Description"
            ' DONE!!!
        Catch ex As Exception
            ' tampilkan pesan error
            MessageBox.Show(ex.Message)
        End Try
    End Sub

    Private Sub RefreshGrid()
        ' siapkan koneksi database
        Dim cn As New SqlConnection(_cnString)
        ' siapkan data adapter untuk data retrieval
        Dim da As New SqlDataAdapter("SELECT A.*, B.Description AS TypeName " & _
                                     "FROM Orders A JOIN OrderTypes B ON A.TypeID=B.ID " & _
                                     "WHERE OrderNum LIKE @p1 AND TypeID = @t1 " & _
                                     "AND OrderDate BETWEEN @d1 AND @d2 ", cn)
        da.SelectCommand.Parameters.AddWithValue("@p1", "%" & TextBox1.Text & "%")
        da.SelectCommand.Parameters.AddWithValue("@t1", ComboBox1.SelectedValue)
        da.SelectCommand.Parameters.AddWithValue("@d1", DateTimePicker1.Value.ToString("yyyy-MM-dd"))
        da.SelectCommand.Parameters.AddWithValue("@d2", DateTimePicker2.Value.ToString("yyyy-MM-dd"))
        ' siapkan datatable untuk menampung data dari database
        Dim dt As New DataTable
        ' enclose di dalam try-catch block
        ' untuk menghindari crash jika terjadi kesalahan database
        Try
            ' ambil data dari database
            da.Fill(dt)
            ' bind data ke combobox
            DataGridView1.DataSource = dt
            ' DONE!!!
        Catch ex As Exception
            ' tampilkan pesan error
            MessageBox.Show(ex.Message)
        End Try
    End Sub

    Private Sub Button1_Click(sender As Object, e As EventArgs) Handles Button1.Click
        ' refresh grid data
        RefreshGrid()
    End Sub

End Class

Penampakan aplikasi berjalan adalah seperti ini

Filter Pengambilan Data Menggunakan Tanggal dan Karakter di VB.net

Selamat Belajar, Salam Pojok Programmer !

Mengisi ComboBox Dengan Data Dari Database

Mengisi ComboBox Dengan Data Dari Database VB.net C#

Belajar Programming | Salah satu hal yang amat sangat umum dalam membuat sebuah aplikasi VB.net atau C# adalah mengisi ComboBox dengan berdasarkan data yang ada di database. Sebenarnya hal ini sangat simple namun bagi para programmer bisa jadi merupakan hal yang sangat sulit 🙂 Cara yang paling mudah adalah dengan menggunakan metoda data-binding sehingga kita bisa menghilangkan dan menghapus code iterasi yang melelahkan saat mengisi data ke combobox bersangkutan. Langkah-langkah atau algoritma dasarnya adalah sebagai berikut:

  • Siapkan koneksi database
  • Siapkan perintah SQL
  • Siapkan variable penampung data (bisa DataTable atau DataSet)
  • Ambil data dari database, masukkan ke DataTable
  • Binding data di DataTable ke ComboBox

Algortima yang sederhana di atas ketika kita terjemahkan ke dalam VB.net akan seperti ini,

Imports System.Data
Imports System.Data.SqlClient

Public Class Form1

    Private Sub Form1_Load(sender As Object, e As EventArgs) Handles Me.Load
        InitializeComboBox()
    End Sub

    Private Sub InitializeComboBox()
        ' siapkan koneksi database
        Dim cn As New SqlConnection(My.Settings.LocalDatabase)
        ' siapkan data adapter untuk data retrieval
        Dim da As New SqlDataAdapter("select account_id, description from acc_accounts", cn)
        ' siapkan datatable untuk menampung data dari database
        Dim dt As New DataTable
        ' enclose in try-catch block
        ' untuk menghindari crash jika terjadi kesalahan database
        Try
            ' ambil data dari database
            da.Fill(dt)
            ' bind data ke combobox
            ComboBox1.DataSource = dt
            ComboBox1.ValueMember = "account_id"
            ComboBox1.DisplayMember = "description"
            ' DONE!!!
        Catch ex As Exception
            ' tampilkan pesan error
            MessageBox.Show(ex.Message)
        End Try
    End Sub

End Class

Sedangkan jika kita terjemahkan ke dalam C# akan menjadi seperti ini,

using System;
using System.Data;
using System.Data.SqlClient;
using System.Windows.Forms;

namespace ComboBoxSample2
{
    public partial class Form1 : Form
    {
        public Form1()
        {
            InitializeComponent();
            InitializeComboBox();
        }

        private void InitializeComboBox()
        {
            // siapkan koneksi database
            SqlConnection cn = new SqlConnection(ComboBoxSample2.Properties.Settings.Default.LocalDatabase);
            // siapkan data adapter untuk data retrieval
            SqlDataAdapter da = new SqlDataAdapter("select account_id, description from acc_accounts", cn);
            // siapkan datatable untuk menampung data dari database
            DataTable dt = new DataTable();
            // enclose in try-catch block
            // untuk menghindari crash jika terjadi kesalahan database
            try
            {
                // ambil data dari database
                da.Fill(dt);
                // bind data ke combobox
                ComboBox1.DataSource = dt;
                ComboBox1.ValueMember = "account_id";
                ComboBox1.DisplayMember = "description";
                // DONE!!!
            }
            catch (Exception ex)
            {
                // tampilkan pesan error
                MessageBox.Show(ex.Message);
            }
        }
    }
}

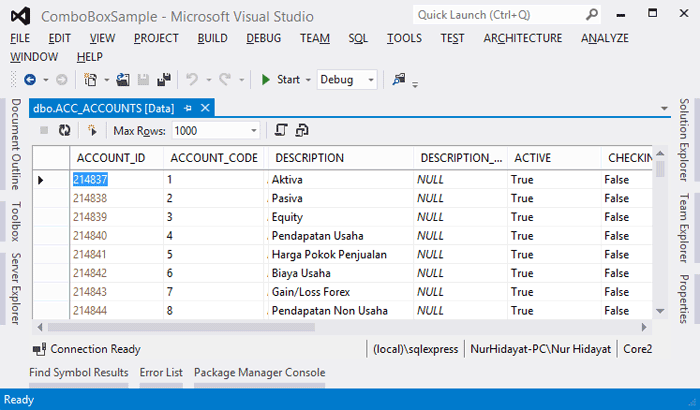
Jika data yang ada di database seperti ini,

Mengisi ComboBox Dengan Data Dari Database VB.net c#

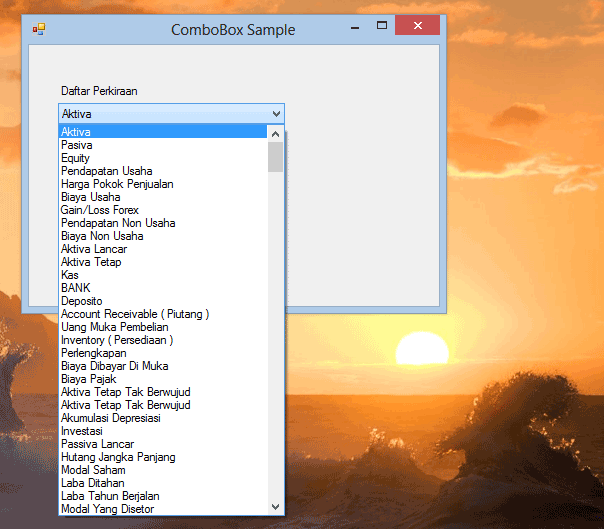
Maka tampilan aplikasinya jadi seperti ini,

Mengisi ComboBox Dengan Data Dari Database VB.net c#

Semoga berguna…. Happy Coding 


^_^

Bingung Bikin Program Mulai dari Mana?

Bingung Bikin Program Mulai dari Mana?

Analisa dan Design | Kebanyakan kita programmer – terutama para pemula – ketika diminta membuat suatu program tertentu misalnya program inventory pasti akan langsung duduk di depan komputer *dan* dijamin pasti kebingungan musti ngapain dulu :)) Solusinya adalah….. Jangan langsung duduk di depan komputer untuk langsung coding… tapi mulai dengan mendefinisikan 5W +1H, dari aplikasi yang sedang kita buat. Kedengarannya seperti sedang membuat skripsi, namun yakinlah langkah ini salah satu tujuannya adalah agar proyek yang sedang kita kerjakan tidak sampai salah arah… Penjabaran ringkas masing-masing poin seperti di bawah ini….


  • Why: Kenapa (why) aplikasi ini perlu dibuat, apa keuntungannya nanti bagi para penggunanya
  • What: Apa saja (what) yang bisa dilakukan oleh aplikasi yang akan Anda buat, misalkan harus bisa mencatat data siswa, guru, nilai, jadwal, dst… dst… Diagram Use-Case di UML sangat membantu menjawab pertanyaan ini.
  • Where: Dimana (where) aplikasi ini akan di-deploy, apakai pakai server khusus di sekolah bersangkutan atau sewa hosting, apakah aplikasinya harus diinstall di setiap client (desktop-based) atau cukup di server saja (web-based)
  • When: Kapan (when) aplikasi ini mulai dan kapan harus selesai dibuat… detilkan jadwal pengerjaan di masing2 fitur yang akan kita buat sesuai penjabaran *what*
  • Who: Tentukan siapa yang akan mengerjakan pembuatan aplikasi ini, perlukah bantuan orang lain? Siapa pula yang akan kita mintakan konsultasi tentang proses bisnis sekolah? Siapa pula user yang bisa kita tanyai untuk mengetahui detil day-to-day activity di sekolah?

Terakhir baru, 

  • How: Tentukan bahasa pemrograman yang akan kita pakai dan database apa yang akan kita pakai. buat desain aplikasi, sitemap, flowchart, alur proses manual serta desain databasenya, banyak sekali metode yang bisa kita pakai, Data Flow Diagram, UML, BPMN dan sebagainya

Setelah semua pertanyaan di atas terjawab… barulah mulai coding…

Happy analysis, design, and development